Tuesday, July 19, 2011

Tape Beams Tutorial

I have seen the tape beams all over the place... not sure where it originated but here is how I do the the tape beams.

Finished product:


What you will need:
  • Base color
  • Top color
  • Scissors
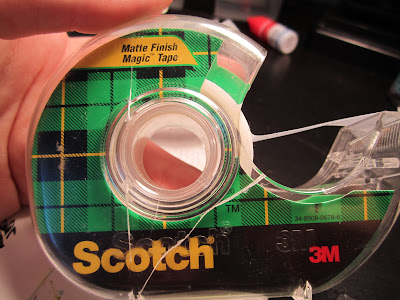
  • Scotch tape


Prior to step 1: 
Paint your nails with your base color and allow them to dry completely.

Step 1:
Tear off a piece of tape big enough to cover your nail with extra hanging over. If you find that the tape is too sticky and pulling your base color off, simply stick the tape to your hand a few times to make it less sticky.

Step 2:
Cut small slices from the tape with your scissors. I chose to make the slices wedge shaped but you can make them any way you want. Remove the small slice and stick the very edge of it to something so that it will not get ruined (I used the edge of my desk). It is easiest if you cut all of the slices for one finger and then tape them on all at once. 

Step 3:
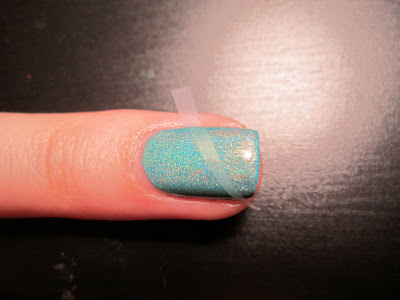
Take one of your slices of tape and stick it to your nail in any direction that you want. Make sure you smooth the tape down all the way and make sure it is sticking to the curved edges of your nails. 


Repeat step 3 until you have taped all of your pieces to your nail. The number and size of the slices of tape is your decision. I used four slices of tape on this nail.


Step 4: 
Once all of the tape pieces are firmly stuck to your nail, take your top color and carefully paint over the entire nail. 


Step 5: 
*Note: It is important that you do step 5 immediately after step four. Do not let the top color dry!
Carefully pull off the tape slices one at a time. I found that it works best to pull upwards on the tape. Apply a topcoat and cleanup any extra polish around the cuticles or on your skin. 


You should get something like this:

Hope you enjoyed this tutorial!

Monday, July 18, 2011

Tape Beams with Spectraflair Topcoat

So I got bored with my spectraflair mani.... which is sad because it was really pretty. I didn't want to take it off so I just added to it. I decided to try scotch tape beams because I had never tried them before. They turned out pretty well. I just need to work on getting the lines to be a little neater... I will get there. I will have a tutorial up for this tomorrow.


The black that I used was WnW Black Creme. What do you think of this look?

Sunday, July 17, 2011

Spectraflair Topcoat

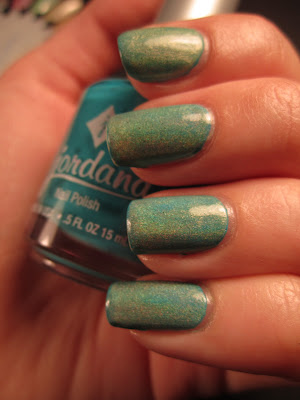
I apologize for being MIA for a whole week. Someone at work was on vacation and so my work schedule was changed. I had to get up almost two hours earlier than I normally do so I have been exhausted all week. I also have not been sleeping well so I had just been way too tired to write up posts all week. My schedule changes back to normal this week so I should have posts for everyday this week. I even have a tutorial for you! Last week I told you about the spectraflair topcoat, well I finally got a chance to wear it. I chose Jordana Boy Oh Boy as the base color because when I swatched the topcoat over different colors, Boy Oh Boy looked the most holo. Some of the pigment in the bottle had settled to the bottom and wouldn't budge so this mani didn't turn out as holo as it should have been. After this mani I ended up taking a small cuticle stick and mixing up the pigment off the bottom of the bottle. After mixing it up, I swatched a few more colors with it and it worked much better. If you buy this topcoat, make sure to mix it very well before using it. Sometimes shaking it is just not enough, even with the bb's in it. Ok enough talking, here it is:


I love holographic nail polish! It is so exciting that I can turn any polish into a holographic polish!

P.S. Please ignore the bubbles :( My SV decided to leave bubbles all over the place.

Sunday, July 10, 2011

Off Topic... But I Would Like You All To Meet Timber :)

A few weeks ago I found a cat in my neighbors yard. My roommates and I were coming home from the bar and this skinny dirty little cat ran right up to us and immediately snuggled up to us. Me being a sucker for cats couldn't leave him outside to starve to death or get hit by a car. We took him inside and gave him a bath, which was fun haha. We took him to the vet... this is where it all went downhill. The vet told us that he thinks that the cat has Lymphoplasmacytic Stomatitis which is a disease that causes the cat's gums to become inflamed and painful. There is no cure for this disease. The vet told us that it would probably be best that we put the cat down. Me being stubborn insisted that we test first to see if that is actually what he had. They had to do a biopsy of his gums for the test. The test results came back and that is indeed what he has but he has a mild case of it and it is treatable. He will always have this disease and will have to be put on antibiotics and steroids occasionally but he is alive and happy. He doesn't seem to be in pain and is able to eat his dry food. As I type this he is snuggled up on my lap :) The several weeks that we had him we didn't want to name him because we didn't want to get too attached (yeah right I was horribly attached after the first day). The past couple of weeks have been ups and downs with this cat and several times I have sat a cried over this cat. We have decided that his disease is manageable and so we are keeping him.

We had a really hard time coming up with a name for him and we sat in the room playing with him for a long time just shouting out names, none of which we could agree on. I pulled open my box of crayons and decided to look at the crayon names for inspiration. The grey crayon in the box was called Timberwolf... so that is where he got his name :) He is such a lap cat!

Here are some pictures of Timber:


He gets along with Geno :)


Isn't he handsome? 

Saturday, July 9, 2011

Nail Mail! Spectraflair Top Coat Arrived Safe and Sound!

So again about the FB group Polish-aholics Anonymous... One of the lovely ladies in the group ordered some spectraflair and has created a top coat that will make any of your nail polishes holographic. AMAZING!!! I know! Thanks so much Lori!


I decided to do some swatches of the topcoat over some different colors.

Here are the swatches before the SF topcoat:
Here are the same colors with the SF topcoat:
This was under a lamp so the holo isn't that great and was hard to photograph. You can see the holo on the first and last swatch the best.

Here is a close up of the last swatch:

I love my SF topcoat so much!!! I now have unlimited holo colors! YAY!

Thursday, July 7, 2011

Neon Stripes and Black Crackle... Lisa Frank Inspired Nails

I wanted to use my new black crackle so I decided to do a Lisa Frank inspired mani. I know I have seen this type of mani somewhere before but I can't remember where. I ended up doing a short tutorial for this design.
Here is what the finished design looks like:


To do this I first painted my nails with white nail polish. I used the white polish as a base because I was using neon colors and the white base makes the neon colors pop. I used Sally Hansen Xtreme Wear White Out:

Then I took my first neon color and painted a diagonal line on my nails like so:


Then I took the second color and painted a second line like so:

I continued doing this until all of the white was covered up:

Once that was dry I put one coat of Funky Fingers Black Scales on each nail. Once that was dry and done cracking, I put on a coat of SV. 


The colors that I used were from a Claires neon set and they don't have names on them.
Hope you like these!

Wednesday, July 6, 2011

Funky Fingers Crackles

I went to Five Below the other day and they had some new polishes! Two of the new polishes that I got were crackles. I didn't have a black or white crackle yet so that is what I got... that is also all they had. The lady at the register told me that they also had silver but they were sold out and that they were expecting to get in some new colors. I will be going back for more! I have also been wanting to try thee Pure Ice crackles. Has anyone tried them and if so are they any good? Well here are the two crackles that I got:

White Scales and Black Scales:


 Swatched over a neon coral color:

 This is a comparison of the Funky Fingers Crackles to the one China Glaze Crackle that I have:
'

To be honest, I like the way the Funky Fingers cracks better than the CG... Just my opinion though. What do you think?

P.S. I have been slacking and have not been doing my nails for the Thursday parties like I said I would. I was going to do plaid for tomorrow because it is our pajama party but I think I would rather do something unrelated.... I will update you on what I decide for tomorrow.

Monday, July 4, 2011

Happy 4th of July!!!

Hello everyone,
I am not dead!! Sorry I have been mia for the past week. I have been busy and didn't have time to do my nails let alone post on here. I am back now and should have time to post this week. I have told you before about the facebook group Polish-aholics Anonymous and the Monday Nail Art Challenge. Last Monday I did not participate in the challenge because the theme was floral and there was no way to incorporate flowers into my True Blood mani. Well this weeks theme was Patriotic. I am addicted to the splatter technique! After finishing the red and blue splatter, I decided to take the splatter to the next level by adding stamping on top... not sure if I have seen that anywhere before. Maybe I am the first lol. In my opinion my nails look like a 4th of July explosion happened on them, but I actually really like them. Well here they are:


For this design I used WnW French Creme White as the base. Then using NYX Ink Heart and Sally Hansen Xtreme Wear Cherry Red, I did splatter on all of the nails. To see my tutorial on splatter nail art go here. I put on a coat of SV and then using a fauxnad plate and WnW French White Creme, I stamped on some stars. I also used a small striping brush to add a little firework on my ring finger. I really like the way this turned out, especially using the same color as the background to stamp with. I hope you enjoyed this and sorry that I have been mia for almost a whole week.

P.S. I have been receiving emails about comments on my blog but when I go to my blog they are not there. I just want everyone to know that I am not deleting comments. Blogger is just being weird and not posting the comments. Thank you for all of your sweet comments though, they are greatly appreciated :)